
AlphaTestEffect
AlphaTestEffect может быть достаточно трудно понять, особенно если Вы не очень хорошо знакомы с компьютерной графикой, с другой стороны он может быть очень полезен в некоторых ситуациях (например, при использовании билбордов).
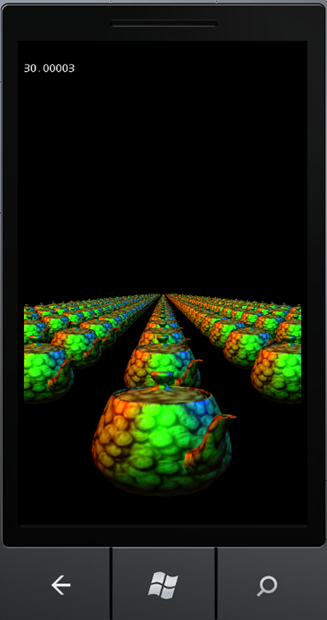
AlphaTestEffect просто ресует текстуру, при этом пропуская пиксели, которые не прошли альфа тест.
Рассмотрим пример. Предположим, что нам нужно нарисовать очень много экземпляров одной и той же модели на экране. Обычно это очень сложная задача для железа.
Для начала создадим простейший счетчик кадров в секунду для того, чтобы измерять производительность.
SpriteFont font;
protected override void LoadContent()
{
    // Create a new SpriteBatch, which can be used to draw textures.
    spriteBatch = new SpriteBatch(GraphicsDevice);

    // TODO: use this.Content to load your game content here
    font = Content.Load<SpriteFont>("defaultFont");

}

protected override void Draw(GameTime gameTime)
{
    // TODO: Add your drawing code here

    GraphicsDevice.Clear(Color.Black);

    float seconds = (float)gameTime.ElapsedGameTime.TotalSeconds;
    if (seconds > 0)
    {
        spriteBatch.Begin();
        spriteBatch.DrawString(font, Window.Title = (1f / seconds).ToString(), Vector2.Zero, Color.White);
        spriteBatch.End();

        // set GraphicsDevice parameters to default after spritebatch work
        GraphicsDevice.BlendState = BlendState.Opaque;
        GraphicsDevice.DepthStencilState = DepthStencilState.Default;
        GraphicsDevice.RasterizerState = RasterizerState.CullCounterClockwise;
        GraphicsDevice.SamplerStates[0] = SamplerState.LinearWrap;
    }

    base.Draw(gameTime);
}
Мы должны увидеть что-то около 30, так как это значение установлено в конструкторе класса Game1.
Замечание:
Это не лучший способ сделать счетчик кадров в секунду. Значительно лучше считать количество, которые на самом деле были нарисованы за прошедшую секунду.
Следующий метод рисует 900 моделей.
private void SlowDraw(ref Matrix world, ref Matrix view, ref Matrix projection, Matrix[] transforms)
{
for (float i = -2; i <= 2; i += 0.5f)
{
for (float j = 0; j < 100; j++)
{
DrawTeapot(world * Matrix.CreateTranslation(i, 0, -j), view, projection, transforms);
}
}
}
Вы должны увидеть значительное снижение производительности.

В этой ситуации может быть использован следующий эффективный прием:
- Нарисовать только одну модель в отдельную текстуру
- Скопировать текстуру во все места, где она будет нужна
Однако на втором шаге мы сталкиваемся с проблемой смешивания цветов. Мы ведь хотим рисовать только ту часть текстуры, на которой находится модель, а остальные пиксели должны быть пропущены. Вот тут нам и может помочь AlphaTestEffect. Все прозрачные пиксели из текстуры не появятся на экране (более того, они не появятся в буфере глубины, что, несомненно, очень важно).
Следующий код создает отдельную поверхность рисования и рендерит туда модель.
RenderTarget2D renderTarget;
protected override void LoadContent()
{
    // Create a new SpriteBatch, which can be used to draw textures.
    spriteBatch = new SpriteBatch(GraphicsDevice);

    // TODO: use this.Content to load your game content here
    model = Content.Load<Model>("teapot");
    font = Content.Load<SpriteFont>("defaultFont");

    renderTarget = new RenderTarget2D(GraphicsDevice, 512, 512, false, SurfaceFormat.Color, DepthFormat.Depth24);
}

private void DrawToRenderTarget(ref Matrix world, ref Matrix view, ref Matrix projection, Matrix[] transforms)
{
    // save main render target
    RenderTargetBinding[] previousRenderTargets = GraphicsDevice.GetRenderTargets();

    GraphicsDevice.SetRenderTarget(renderTarget);

    // fill with transparent color before rendering model
    GraphicsDevice.Clear(Color.Transparent);
    DrawTeapot(world, view, projection, transforms);

    // restore render target
    GraphicsDevice.SetRenderTargets(previousRenderTargets);
}
Теперь, когда у нас есть текстура с одним чайником на плоскости рисования renderTarget, мы можем создать геометрию для билбордов, которые будут клонированы по всей сцене. Мы также создадим экземпляр AlphaTestEffect и установим его параметры так, чтобы только пиксели, у которых значение альфы Больше некоторого значения (например, 128), были нарисованы.
AlphaTestEffect alphaTestEffect;
protected override void LoadContent()
{
    // Create a new SpriteBatch, which can be used to draw textures.
    spriteBatch = new SpriteBatch(GraphicsDevice);

    // TODO: use this.Content to load your game content here
    model = Content.Load<Model>("teapot");
    font = Content.Load<SpriteFont>("defaultFont");

    renderTarget = new RenderTarget2D(GraphicsDevice, 512, 512, false, SurfaceFormat.Color, DepthFormat.Depth24);
    alphaTestEffect = new AlphaTestEffect(GraphicsDevice);
    alphaTestEffect.AlphaFunction = CompareFunction.Greater;
    alphaTestEffect.ReferenceAlpha = 128;

}
private void DrawBillboards(Matrix world, Vector3 cameraPosition, Vector3 cameraTarget, Matrix view, Matrix projection)
{
    int count = 900;

    float width = 0.3f;
    float height1 = 0.9f;
    float height2 = -0.1f;

    // Create billboard vertices.
    VertexPositionTexture[] vertices = new VertexPositionTexture[count * 4];
    int index = 0;

    for (float i = -2; i <= 2; i += 0.5f)
    {
        for (float j = 0; j < 100; j++)
        {
                Matrix worldMatrix = world * Matrix.CreateTranslation(i, 0, -j);

                Matrix billboard = Matrix.CreateConstrainedBillboard(worldMatrix.Translation, cameraPosition, Vector3.Up, cameraTarget - cameraPosition, null);

                vertices[index].Position = Vector3.Transform(new Vector3(width, height1, 0), billboard);
                vertices[index++].TextureCoordinate = new Vector2(0, 0);

                vertices[index].Position = Vector3.Transform(new Vector3(-width, height1, 0), billboard);
                vertices[index++].TextureCoordinate = new Vector2(1, 0);

                vertices[index].Position = Vector3.Transform(new Vector3(-width, height2, 0), billboard);
                vertices[index++].TextureCoordinate = new Vector2(1, 1);

                vertices[index].Position = Vector3.Transform(new Vector3(width, height2, 0), billboard);
                vertices[index++].TextureCoordinate = new Vector2(0, 1);
        }
    }


    // Create billboard indices.
    short[] indices = new short[count * 6];
    short currentVertex = 0;
    index = 0;

    while (index < indices.Length)
    {
        indices[index++] = currentVertex;
        indices[index++] = (short)(currentVertex + 1);
        indices[index++] = (short)(currentVertex + 2);

        indices[index++] = currentVertex;
        indices[index++] = (short)(currentVertex + 2);
        indices[index++] = (short)(currentVertex + 3);

        currentVertex += 4;
    }

    // Draw the billboard sprites.
    alphaTestEffect.World = Matrix.Identity;
    alphaTestEffect.View = view;
    alphaTestEffect.Projection = projection;
    alphaTestEffect.Texture = renderTarget;

    alphaTestEffect.CurrentTechnique.Passes[0].Apply();

    GraphicsDevice.DrawUserIndexedPrimitives<VertexPositionTexture>(PrimitiveType.TriangleList, vertices, 0, count * 4, indices, 0, count * 2);
}
protected override void Draw(GameTime gameTime)
{
    // TODO: Add your drawing code here

    Matrix world = Matrix.CreateRotationY((float)gameTime.TotalGameTime.TotalSeconds)
        * Matrix.CreateTranslation(0, -0.4f, 0);
    Matrix view = Matrix.CreateLookAt(new Vector3(0, 0, 1.2f), Vector3.Zero, Vector3.Up);
    Matrix projection = Matrix.CreatePerspectiveFieldOfView(MathHelper.ToRadians(45), GraphicsDevice.Viewport.AspectRatio, 0.1f, 100f);

    Matrix[] transforms = new Matrix[model.Bones.Count];
    model.CopyAbsoluteBoneTransformsTo(transforms);

    DrawToRenderTarget(ref world, ref view, ref projection, transforms);

    GraphicsDevice.Clear(Color.Black);
    DrawBillboards(world, new Vector3(0, 0, 1.2f), Vector3.Zero, view, projection);


    float seconds = (float)gameTime.ElapsedGameTime.TotalSeconds;
    if (seconds > 0)
    {
        spriteBatch.Begin();
        spriteBatch.DrawString(font, Window.Title = (1f / seconds).ToString(), Vector2.Zero, Color.White);
        spriteBatch.End();

        // set GraphicsDevice parameters to default after spritebatch work
        GraphicsDevice.BlendState = BlendState.Opaque;
        GraphicsDevice.DepthStencilState = DepthStencilState.Default;
        GraphicsDevice.RasterizerState = RasterizerState.CullCounterClockwise;
        GraphicsDevice.SamplerStates[0] = SamplerState.LinearWrap;
    }

    base.Draw(gameTime);
}
Теперь счетчик FPS должен снова показывать число 30.
EnvironmentMapEffect
EnvironmentMapEffect – это еще один великолепный эффект, который поддерживается в XNA Framework. Он позволяет с легкостью накладывать карту окружения на модель.
Карда окружающей среды должна быть представлена в виде кубической карт (cube map), которая может быть создана динамически во время работы программы или подготовлена заранее в каком-нибудь редакторе (например DirectX Texture Tool из Direct SDK) и сохранена в формате DDS.
Карта окружающей среды содержит шесть отдельных текстур, соответствующих проекциям окружающей среды с каждой стороны модели, на которую предполагается накладывать карту среды.
Кубическая карта должна выглядеть примерно так:

Для того чтобы применить EnvironmentMapEffect, установите EnvironmentMapEffect в качестве значения свойства Content Processor -> Default Effect.
Наш код для рендеринга модели будет очень похож на код для BasicEffect. Более того, EnvironmentMapEffect поддерживает практически все визуальные эффекты BasicEffect, такие как туман, освещение и т.д.
Model model;
TextureCube envMap;

Texture2D background;
Texture2D bunnyTexture;
    protected override void LoadContent()
{
    // Create a new SpriteBatch, which can be used to draw textures.
    spriteBatch = new SpriteBatch(GraphicsDevice);

    // TODO: use this.Content to load your game content here
    model = Content.Load<Model>("bunny");
    envMap = Content.Load<TextureCube>("env");
    background = Content.Load<Texture2D>("back");

    bunnyTexture = Content.Load<Texture2D>("metal1");
}
    protected override void Draw(GameTime gameTime)
{
    GraphicsDevice.Clear(Color.Black);

    // Draw background
        spriteBatch.Begin();
    spriteBatch.Draw(background, new Rectangle(0, 0, 480, 800), Color.White);
    spriteBatch.End();

    // Restore default parameters for GraphicsDevice
    GraphicsDevice.BlendState = BlendState.Opaque;
    GraphicsDevice.DepthStencilState = DepthStencilState.Default;
    GraphicsDevice.RasterizerState = RasterizerState.CullCounterClockwise;
    GraphicsDevice.SamplerStates[0] = SamplerState.LinearWrap;


    Matrix world = Matrix.CreateRotationY(MathHelper.PiOver4)
        * Matrix.CreateTranslation(0, -0.4f, 0);
    Matrix view = Matrix.CreateLookAt(new Vector3(0, 0, 1.2f), Vector3.Zero, Vector3.Up);
    Matrix projection = Matrix.CreatePerspectiveFieldOfView(MathHelper.ToRadians(45), GraphicsDevice.Viewport.AspectRatio, 0.1f, 10f);

    Matrix[] transforms = new Matrix[model.Bones.Count];
    model.CopyAbsoluteBoneTransformsTo(transforms);

    foreach (ModelMesh mesh in model.Meshes)
    {
        foreach (EnvironmentMapEffect effect in mesh.Effects)
        {
            effect.EnableDefaultLighting();


            effect.EnvironmentMap = envMap;
            effect.Texture = bunnyTexture;

            effect.View = view;
            effect.Projection = projection;
            effect.World = transforms[mesh.ParentBone.Index] * world;
        }
        mesh.Draw();
    }

    base.Draw(gameTime);
}

Сейчас наш кролик выглядит слишком блестящим. Количество отраженного света задается через параметр EnvironmentMapAmount эффекта.
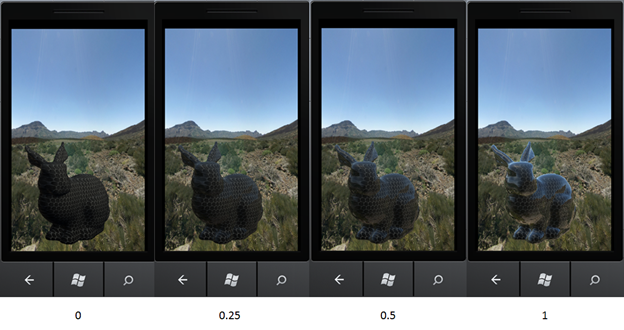
Например, значение 0.5 означает, что исходная текстура и карта окружения будут смешаны 50 на 50.
EnvironmentMapEffect также поддерживает эффект Френеля, который во многих случаях добавляет реалистичности.
Еще один интересный трюк, который можно сделать с EnvironmentMapEffect, это возможность симуляции сложного освещения сцены, используя альфа канал карты окружающей среды.
(Подробно описано тут http://blogs.msdn.com/b/shawnhar/archive/2010/08/09/environmentmapeffect.aspx).


 Ссылка на IT-Portfolio.NET